Your Dream, Our Blueprint: The Ultimate Homeowner’s Guide to Removing a Load-Bearing Wall in Denver
Across Denver, from the historic bungalows of the Highlands to the modern homes of Cherry Creek, a shared dream is taking shape: a living space that’s open, bright, and brings people together. The era of compartmentalized rooms is fading, making way for a lifestyle built around connection and flow.
But often, standing between your current layout and that light-filled, open-concept dream is a single, critical obstacle: a load-bearing wall.
If you’re considering this project, you’re on the verge of one of the most transformative renovations possible for your home. This isn’t just about demolition; it’s about reimagining how you live. This is your ultimate guide. We’ll go beyond the basics to explore the engineering principles, the real-world costs, the crucial role of professionals, and the specific considerations for Denver homeowners, giving you the confidence to move forward.
Chapter 1: The Heart of Your Home: What a Load-Bearing Wall Really Does
Before you even think about a sledgehammer, it’s vital to appreciate what these walls do. Think of your home as a body; load-bearing walls are its spine. They are a core part of the structural skeleton, expertly channeling immense forces safely down to the foundation.
A Deeper Look at a Structural Workhorse
This wall tirelessly supports the “load” of all the elements above it. This includes:
Dead Loads: The static, unchanging weight of the building’s own materials (roof trusses, shingles, drywall, the floor system, etc.).
Live Loads: The transient, temporary weights of life inside the home (you, your family, furniture, appliances).
Environmental Loads: This is especially important in Denver. It includes the significant, heavy weight of snow accumulation on your roof during our winter months.
This combined load is transferred by the wall down to the foundation and into the earth. Removing this critical support without a properly engineered replacement is like knocking the legs out from under a table—the results can be disastrous.
A Home Detective’s Guide to Spotting a Load-Bearing Wall
While we must reiterate that only a licensed structural engineer can make a definitive diagnosis, you can become an educated observer with these advanced clues:
Follow the Structural Trail: Start in your basement or crawlspace. Look for main support beams, often made of steel or thick laminated wood. Any wall on the main floor situated directly above these primary beams is almost certainly load-bearing.
Inspect the Attic: Look at how your roof structure is supported. If you see vertical posts or braces resting on a particular interior wall, that wall is actively holding up your roof.
Look for Joist Overlaps: In the basement, look up at the floor joists supporting the main level. If the joists aren’t single, continuous boards spanning the house, but instead are two separate joists that meet and overlap on top of a wall, that wall is absolutely load-bearing.
Common Misconception: “Exterior walls are always load-bearing, and interior walls are not.” This is false. While most exterior walls are structural, many interior walls—especially those near the center of a home—are also vital supports for the floors and roof above.
Chapter 2: The Crossroads: Why ‘DIY’ Becomes ‘Destroy It Yourself’
The internet is filled with renovation shows that make complex projects look deceivingly simple. Let’s be perfectly clear: this is not one of them.
The Definitive Answer: “Can I Remove a Load-Bearing Wall Myself?”
For the safety of your family, the preservation of your property’s value, and for legal compliance, the answer is an emphatic no. The structural calculations required are complex. The physical work is dangerous and requires specialized knowledge of temporary shoring. The risks are simply too immense.
The Hidden Financial Nightmares of a DIY Disaster:
Foundation Failure: An improperly distributed load can cause your foundation to crack or settle—a repair that can easily cost tens of thousands of dollars.
Structural Sagging: You’ll begin to notice ceilings bowing, floors becoming uneven, and ridges appearing on your roofline as the house begins to fail.
Widespread Cosmetic Damage: Cracks will spiderweb through drywall across your home. Doors and windows will jam as their frames are twisted out of square.
Voided Homeowner’s Insurance: If your unpermitted, non-professional work leads to a structural failure, your insurance provider will almost certainly deny your claim, leaving you responsible for the full, catastrophic cost of repairs.
Assembling Your Denver Dream Team To execute this project correctly, you need two key professionals:
A Licensed Structural Engineer: This is your project’s architect and strategist. Their role is non-negotiable. They perform the site analysis and create the stamped engineering plans that are legally required to obtain a permit. This is the core of our Residential Structural Engineering Services in Denver.
A Reputable General Contractor: This is your project’s director and manager. They will interpret the engineer’s plans, hire and manage the skilled trades, source materials, and ensure a safe job site from start to finish.
Chapter 3: From Blueprint to Beautiful: The Step-by-Step Professional Process
So, how is a load-bearing wall removed safely? It’s a meticulous, multi-stage process where safety and precision are paramount.
Step 1: The In-Depth Structural Consultation An engineer will visit your home to conduct a thorough investigation, assessing the foundation, joists, roof structure, and support posts. This is your chance to ask questions and ensure they understand your vision.
Step 2: The Engineering Design & Calculations Here, the solution is designed. The engineer creates a detailed blueprint specifying the replacement beam. They determine its size, material, and the requirements for the support points at each end, which must now handle the new, concentrated “point loads.”
Step 3: Navigating the Denver Building Department Permit Process Your contractor submits the engineer’s plans to the city. This isn’t just bureaucracy; it’s your peace of mind. The permit review ensures the project adheres to the International Building Code, protecting your home’s safety and value.
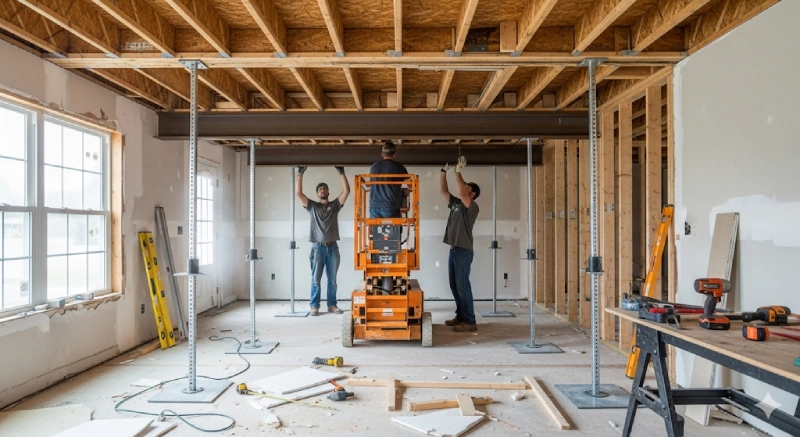
Step 4: The “Structural Surgery” – Preparation & Demolition This is a critical safety step. The construction crew builds temporary support walls on both sides of the wall being removed, creating a temporary skeleton to carry the full load. Then, the wall is carefully deconstructed, and any electrical, plumbing, or HVAC lines are professionally rerouted.
Step 5: Installing the New Backbone – The Support Beam The new permanent beam is lifted into place. The choice of beam is a key decision based on span, load, and aesthetics.
Beam Type
Material
Pros
Cons
Best For
LVL Beam
Laminated Veneer Lumber
Strong, cost-effective, easy for crews to handle.
Bulkier, may require a “dropped” look below the ceiling line.
Most standard residential projects and spans.
Steel I-Beam
Structural Steel
Extremely strong, allows for longer spans, slimmer profile.
Heavy, requires more labor to install, more expensive.
Very long spans, heavy loads, or when a perfectly flush ceiling is required.
Glulam Beam
Glued Laminated Timber
Strong, can be left exposed for a beautiful architectural look.
Often more expensive than LVL, can be very heavy.
Projects with a rustic or “mountain modern” aesthetic.
Flush Beam vs. Dropped Beam?
Dropped Beam: Simpler and less expensive. The beam is installed directly below the ceiling joists and then framed with drywall.
Flush Beam: More labor-intensive and expensive. The joists are cut and hung from the sides of the beam, creating a seamless, flat ceiling.
Step 6: The Final Polish – Finishing & Inspections With the new beam secure, temporary supports are removed. The area is finished with drywall, texturing, and paint. A city inspector performs a final inspection to sign off on the work, officially closing the permit.
Chapter 4: Decoding the Investment: A Transparent Look at Costs in Denver
Budget is a primary concern. In the Denver metro area, the total cost for a professional load-bearing wall removal typically falls within a range of $5,000 to $20,000, with complex projects sometimes exceeding this.
A Detailed Cost Breakdown:
Engineering & Plans: $700 – $2,000
Permit Fees: $300 – $800
Materials (Beam, Posts, etc.): $500 – $3,500+
Labor (Demolition & Construction): $3,000 – $10,000+ (This is the largest variable)
Pro Tip: When reviewing bids from contractors, look for transparency. A professional bid will itemize these costs. Be wary of a single, vague number, as it may hide shortcuts on permits or engineering.
Chapter 5: Beyond the Renovation: The True Value of an Open Space
A well-executed open-concept renovation is one of the best investments you can make. It’s about more than money. It’s about lifestyle ROI: watching your kids play from the kitchen, hosting holidays where everyone feels included, and filling your home with natural light.
In the competitive Denver real estate market, these are the homes that capture buyers’ hearts. They often sell faster and for a premium. An unpermitted or poorly done job, however, can scare buyers away and significantly decrease your home’s value.
Conclusion: Your Vision, Engineered for Safety
Removing a load-bearing wall is a journey that blends your design vision with the uncompromising principles of structural engineering. It’s a project that promises a spectacular return in lifestyle and home value, but it demands respect, expertise, and a commitment to safety. By hiring a qualified team, you are investing in the long-term integrity and safety of your most valuable asset.
Your Next Step Ready to take the first step toward that beautiful, open space you’ve been dreaming of? Don’t guess—get an expert assessment.
Contact ISTA Engineers today for a comprehensive structural consultation. Our experienced Denver-based team is here to provide the answers and the engineered solutions you need to bring your vision to life, safely and successfully.
Frequently Asked Questions (FAQ)
Q1: How long does the entire process take? From the first call to the final inspection, a typical project takes 4 to 8 weeks. This includes time for the engineering design and the city’s permit review. The actual on-site construction usually takes 5 to 12 business days.
Q2: What about the flooring? Will it need to be replaced? Yes, you will have a gap in the flooring where the wall used to be. You will need to plan for patching it. Many homeowners use this as the perfect opportunity to install new, continuous flooring throughout the newly opened space for a seamless look.
Q3: What if you find something unexpected after opening the wall? This is where a professional team shines. An experienced engineer and contractor can assess unexpected plumbing or electrical lines, adapt the plan on the fly, and implement a safe, code-compliant solution without compromising the project.
Q4: Can I live in my house during the project? While you can stay for most of it, it’s highly recommended that you, your children, and pets be out of the house during the main demolition and beam installation phase (usually 1-2 days). This part of the process is extremely dusty, noisy, and hazardous.
Q5: Why is a “point load” so important to manage? A wall spreads a load out over its entire length (like lying on a bed of nails). A beam concentrates that entire load onto two small points (like stepping on a single nail). The structure below these two “point loads” must be properly reinforced all the way down to the foundation to handle this immense, focused pressure. This is one of the most critical aspects an engineer designs for.